DIY Flower Wall & Plywood Backdrop
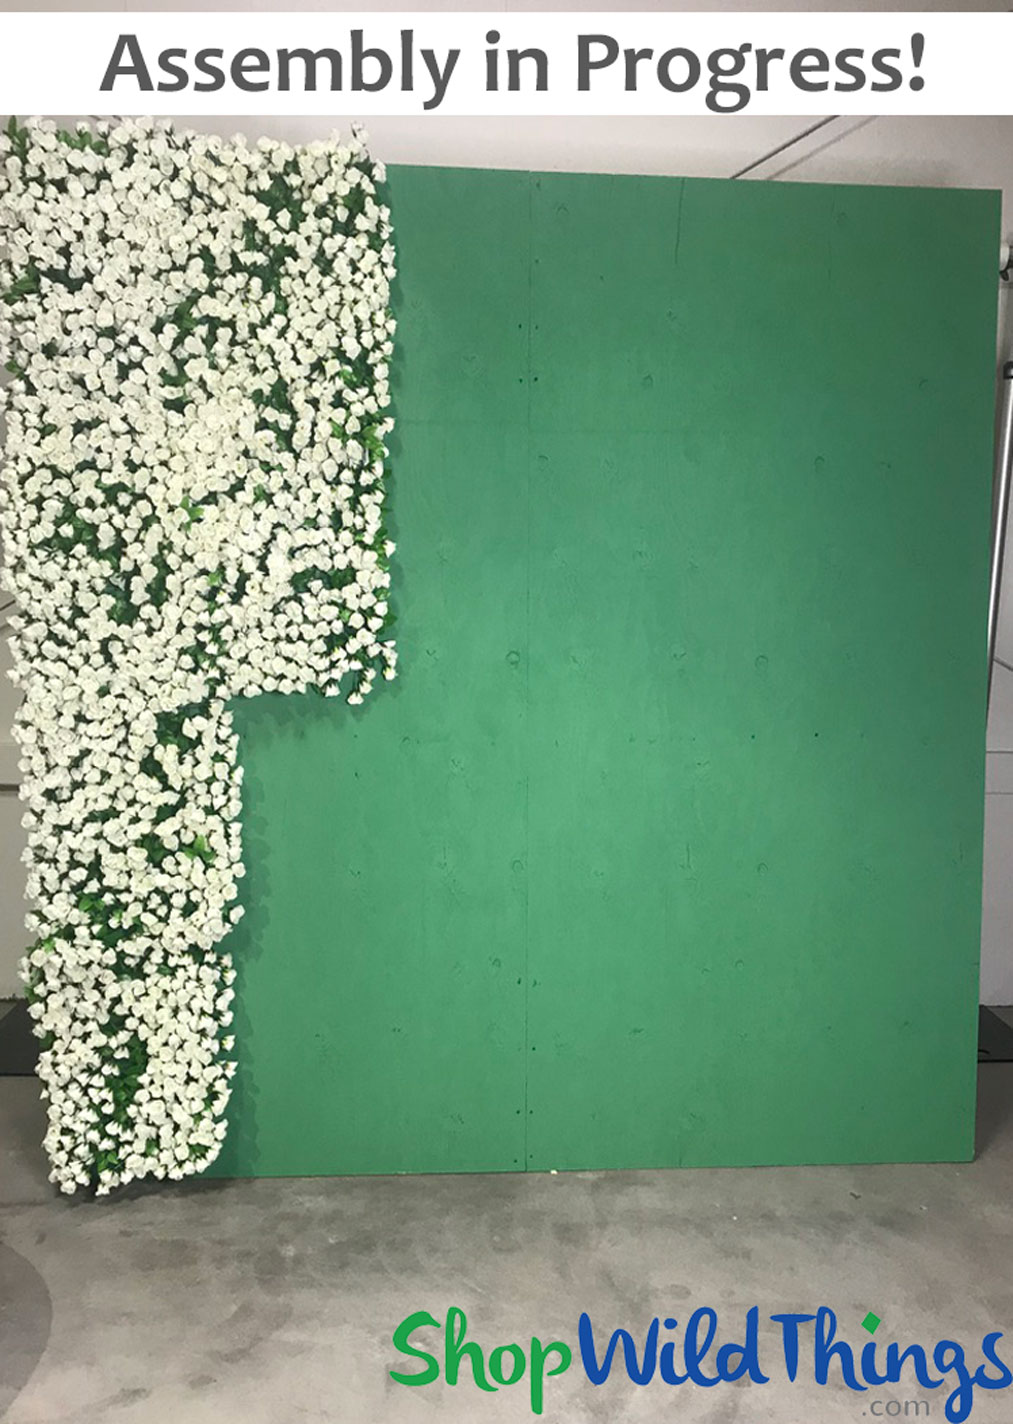


Yes, YOU can Build an 8 Foot x 8 Foot Plywood Backdrop Stand!
In this tutorial, we will provide you with a detailed shopping list, step-by-step assembly instructions for your stand, and some images of the finished Floral Backdrop with front and back views. The video discusses worthwhile information that you will also want to have to ensure your success. If you have any questions, we are always available.
Scroll down under the video to see your shopping list, instructions, and more photos of this job under construction.
Shopping List:
Note: Most local lumber stores will make these cuts for you at no charge. There are no complicated angles, making this so easy!
* 2 Pcs Plywood 4' x 8' 3/8" Thick (backdrop walls)
* 2 Pcs 2" x 4"'s - Cut to 46 " Long Each (legs)
* 2 Pcs 2" x 4"'s - Cut to 24" Long Each (braces in between 2 walls)
* 2 Pcs 2" x 4"'s - Cut to 6" Long Each (anchors for legs)
* 1 Pc 2" x 4"'s - Cut to 72" Long Each (center brace for legs)
* 1 Gallon Green Paint (half gallon may work)
* 28 Pcs 6" x 1 5/8" Coarse Thread Drywall Screws
* 12 Pcs 8" x 3" Course Thread Drywall Screws
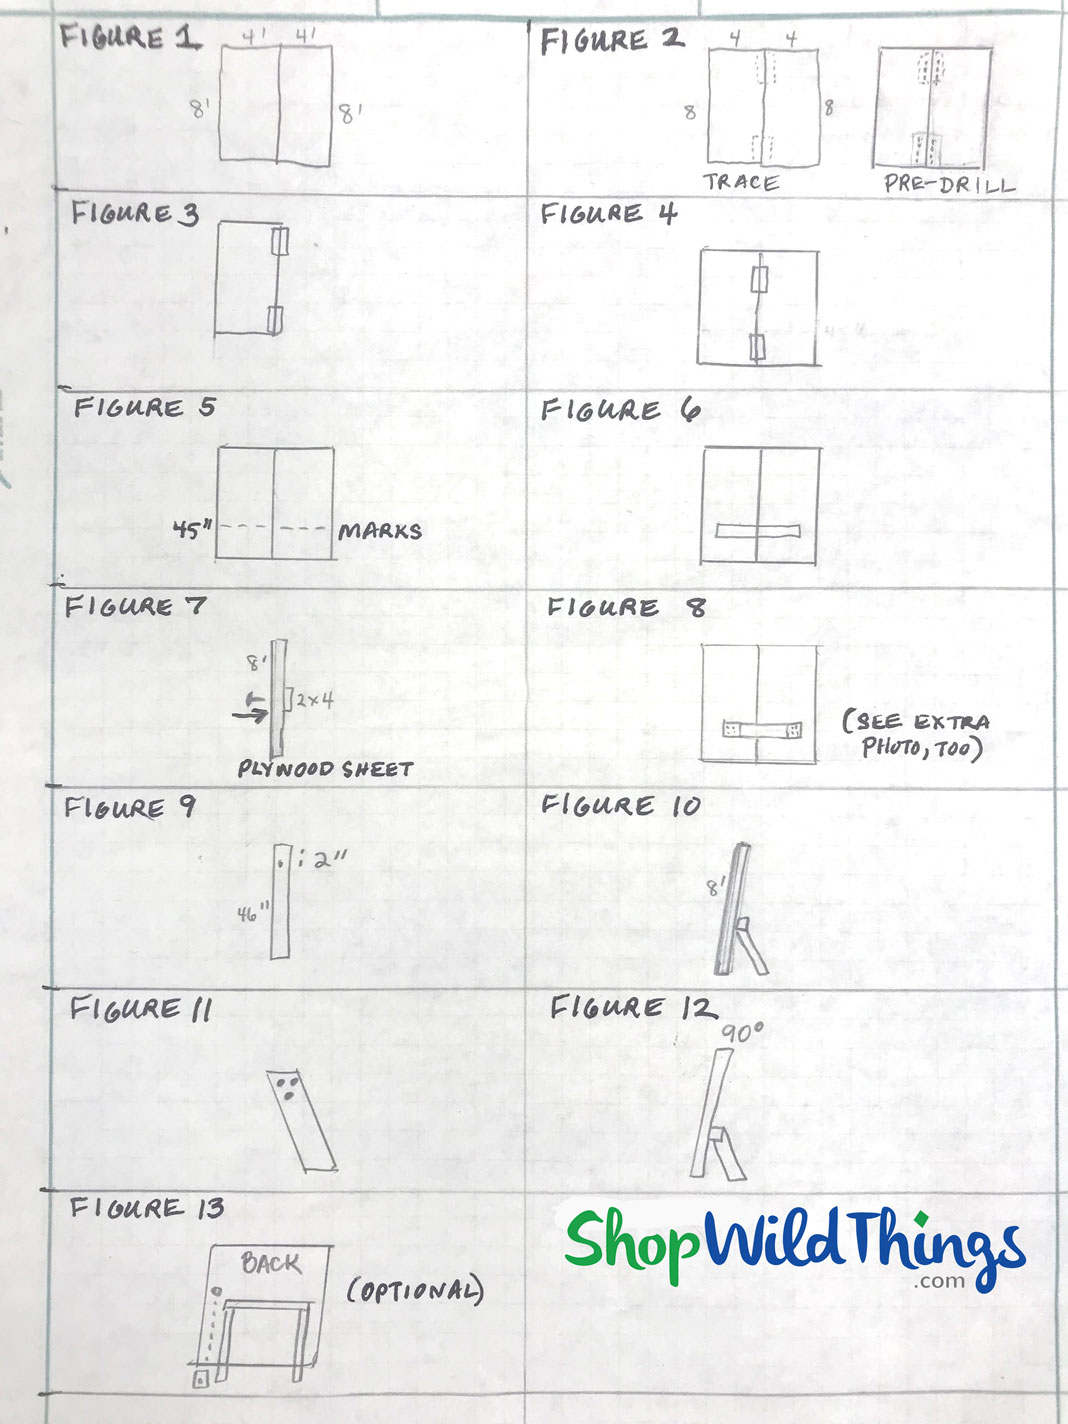
Building Instructions: (PRINT THE PHOTO FOR FIGURES)
1. Lay the (2) 4' x 8' Plywood Sheets side by side. - Figure 1
2. Center one 2" x 4" x 24" just below the edge of the top and bottom of the 4 x 8 sheets and trace outline (4 each) - See Figure 2
3. Remove 2" x 4" x 24" - Predrill 1/8" holes evenly in the areas on both sheets - See Figure 2
4. Stand one sheet 4' x 8' up. Have an assistant hold (1) 2" x 4" at the top of the traced area, placing half of the 2" x 4" on the plywood
5. Using (4) 6 x 1 5/8" screws, fasten the 2 x 4 to the plywood and repeat at the bottom
6. Match up the other 4' x 8' sheet and repeat the previous process. See Figure 4
7. Measure 45" up from the bottom at several points across the plywood. Using a straight edge, mark a line across the plywood. Use this as a guide for the 72" 2x4. Using your mark, center the 2x4 on the Plywood. Trace the outline of the 2x4 and remove. Predrill 1/8" holes (12) evenly spaced. Hold 2x4 back in the traced area and secure with (12) 6 x 1 5/8" screws from the front side. See Figures 5, 6 and 7
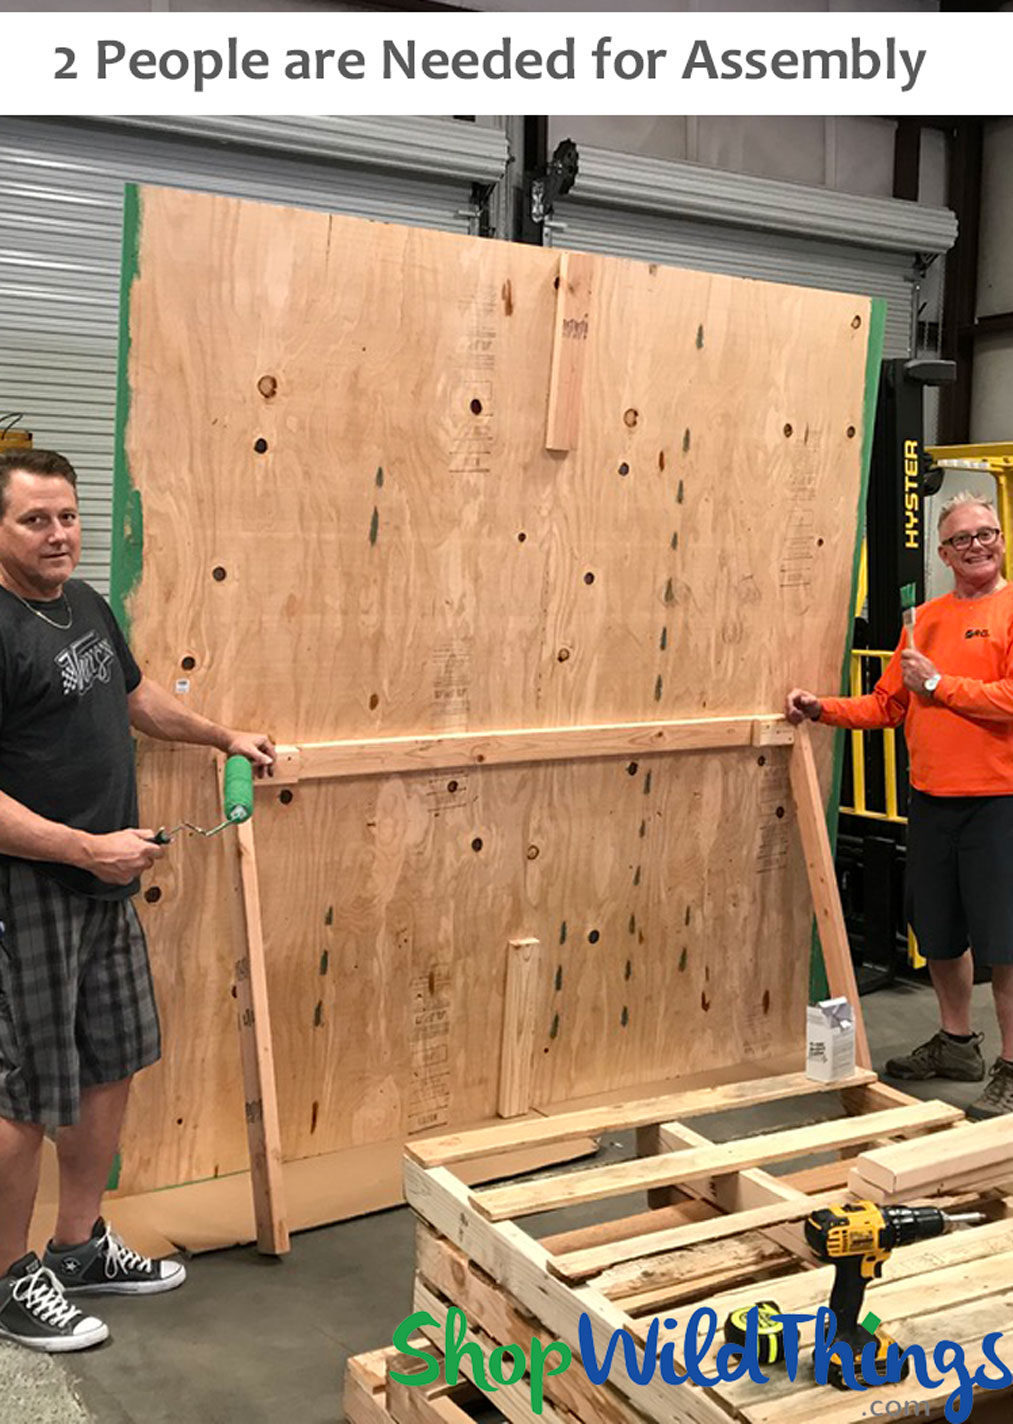
8. Place (1) 2"x 4" x 6" at the end of the 72" 2x4 and secure using (4) 8" x 3" screws. Repeat on the other side. See Figure 8 and Photograph
9. Take the (2) 46 " 2 x 4's and pre-drill 1/8" hole approximately 2" down and centered at one end. Repeat on the second 2 x 4. See Figure 9
10. With Assistance, stand the wall up almost 90 degrees. Place 46 " 2x4 with Pre-Drilled Holes up to 2x4 doubles section at the end See Figure 10
11. Secure with (1) 8" x 3" Screw using Pre-drilled 1/8" hole. Re-adjust wall angle (if necessary) and secure with (2) more 8" x 4" screws. Make sure that each screw penetrates the doubled 2x4" Repeat steps 9 through 11 on the opposite side. (see Figures 11, 8, and the Photograph showing this back area)
12. Carefully release wall and observe steadiness and ability to "freestand" There should be a light lean toward the support legs. See Figure 12
13. Optional: For additional support and strength, an anchor line can be attached by drilling a hole on either side approximately 60" up from the bottom. Using a cinderblock or weighted plate - secure a rope line to the back of the wall and adjust tension by moving the block or weight away from the wall. Keep enough tension so the wall will not tip forward. If the wall is used outdoors on a soft surface (i.e. grass or dirt, drill holes in the support legs at the bottom and drive spikes into the ground. See Figure 13
Important: The stability of the structure should be checked after the application of flower panels is complete. Gently and carefully apply pressure from the front and then the rear to make sure that the structure is secure and will not tip over in either direction. See Instruction #13 to add more stability if you're concerned. The sample Flower Wall that we built in the video was stable on a concrete floor even full of 24 panels of flowers without extra support.


In this tutorial, we will provide you with a detailed shopping list, step-by-step assembly instructions for your stand, and some images of the finished Floral Backdrop with front and back views. The video discusses worthwhile information that you will also want to have to ensure your success. If you have any questions, we are always available.
Scroll down under the video to see your shopping list, instructions, and more photos of this job under construction.
Shopping List:
Note: Most local lumber stores will make these cuts for you at no charge. There are no complicated angles, making this so easy!
* 2 Pcs Plywood 4' x 8' 3/8" Thick (backdrop walls)
* 2 Pcs 2" x 4"'s - Cut to 46 " Long Each (legs)
* 2 Pcs 2" x 4"'s - Cut to 24" Long Each (braces in between 2 walls)
* 2 Pcs 2" x 4"'s - Cut to 6" Long Each (anchors for legs)
* 1 Pc 2" x 4"'s - Cut to 72" Long Each (center brace for legs)
* 1 Gallon Green Paint (half gallon may work)
* 28 Pcs 6" x 1 5/8" Coarse Thread Drywall Screws
* 12 Pcs 8" x 3" Course Thread Drywall Screws
Building Instructions: (PRINT THE PHOTO FOR FIGURES)
1. Lay the (2) 4' x 8' Plywood Sheets side by side. - Figure 1
2. Center one 2" x 4" x 24" just below the edge of the top and bottom of the 4 x 8 sheets and trace outline (4 each) - See Figure 2
3. Remove 2" x 4" x 24" - Predrill 1/8" holes evenly in the areas on both sheets - See Figure 2
4. Stand one sheet 4' x 8' up. Have an assistant hold (1) 2" x 4" at the top of the traced area, placing half of the 2" x 4" on the plywood
5. Using (4) 6 x 1 5/8" screws, fasten the 2 x 4 to the plywood and repeat at the bottom
6. Match up the other 4' x 8' sheet and repeat the previous process. See Figure 4
7. Measure 45" up from the bottom at several points across the plywood. Using a straight edge, mark a line across the plywood. Use this as a guide for the 72" 2x4. Using your mark, center the 2x4 on the Plywood. Trace the outline of the 2x4 and remove. Predrill 1/8" holes (12) evenly spaced. Hold 2x4 back in the traced area and secure with (12) 6 x 1 5/8" screws from the front side. See Figures 5, 6 and 7
8. Place (1) 2"x 4" x 6" at the end of the 72" 2x4 and secure using (4) 8" x 3" screws. Repeat on the other side. See Figure 8 and Photograph
9. Take the (2) 46 " 2 x 4's and pre-drill 1/8" hole approximately 2" down and centered at one end. Repeat on the second 2 x 4. See Figure 9
10. With Assistance, stand the wall up almost 90 degrees. Place 46 " 2x4 with Pre-Drilled Holes up to 2x4 doubles section at the end See Figure 10
11. Secure with (1) 8" x 3" Screw using Pre-drilled 1/8" hole. Re-adjust wall angle (if necessary) and secure with (2) more 8" x 4" screws. Make sure that each screw penetrates the doubled 2x4" Repeat steps 9 through 11 on the opposite side. (see Figures 11, 8, and the Photograph showing this back area)
12. Carefully release wall and observe steadiness and ability to "freestand" There should be a light lean toward the support legs. See Figure 12
13. Optional: For additional support and strength, an anchor line can be attached by drilling a hole on either side approximately 60" up from the bottom. Using a cinderblock or weighted plate - secure a rope line to the back of the wall and adjust tension by moving the block or weight away from the wall. Keep enough tension so the wall will not tip forward. If the wall is used outdoors on a soft surface (i.e. grass or dirt, drill holes in the support legs at the bottom and drive spikes into the ground. See Figure 13
Important: The stability of the structure should be checked after the application of flower panels is complete. Gently and carefully apply pressure from the front and then the rear to make sure that the structure is secure and will not tip over in either direction. See Instruction #13 to add more stability if you're concerned. The sample Flower Wall that we built in the video was stable on a concrete floor even full of 24 panels of flowers without extra support.
To see a larger copy of these drawings below, please scroll to the main images at the top of the page. You can enlarge that image quite a bit and print it.
